Picking your first lock
Lock picks are legal in most places: thieves find it much easier to break the lock, or, break the wall. Despite this, some countries ban the possession of lockpicks. If this is the case where you live, find a different hobby.
To avoid the appearance of criminality, it's not a good idea to pick locks you don't own or have permission to pick. Additionally, since there is a small risk of damaging the lock, it's best to avoid picking a lock that you rely on.
Permission to open a lock is not necessarily the same as permission to pick it: even if your local laws don't make a distinction, the owner will.
Tools:
As a rule, I'd avoid the Amazon/Aliexpress/Ebay house brand.
Suspiciously cheap chinese pick sets are usually too thick to fit inside common locks and pad the numbers by including useless profiles. More subtly, they are often made out of cheap metal and will rust easily or bend/break inside the lock.
Anything decent will be cut from 301 or 420 stainless spring steal.
On the other side of the price range, some manufacturers advertise "aircraft grade titanium" (R56400 alloy): this is gimmick and the metal is significantly weaker than good steel. (and yes, it can be picked up by metal detectors)
Metal detectors detect conductivity by using an AC magnetic field to induce eddy currents. The sneakiest tools will be ones withe minimal loop area: consider small tangs with plastic handles or the handle-less "bogota" style picks.
If you're in North America, I can recommend the "Essential Lock Pick Set" from Red Team Tools. These made from 301 full-hard, have a good range of profiles and turners:
https://www.redteamtools.com/essential-lock-pick-set/
Elsewhere, look for something with a "short hook" and "half-diamond" pick. After that, look for a good variety of turning tools (L or Z shaped bars).
Good manufacturer should also sell single picks: The metal used is quite thin and can break as a result of rough use... and beginners tend to be quite hard on their tools.
Specifically, avoid pushing so hard that the pick bends. Bent tools can be straightened out with pliers, but doing this repeatedly causes metal fatigue and makes it brittle.
Lock principles:
In a pin-tumbler lock, the keyway is cut into a brass cylinder (the plug), which fits into a matching hole in the lock's body (the bible). To prevent the plug from turning without the key, a series of pin stacks enter the plug opposite to the keyway:
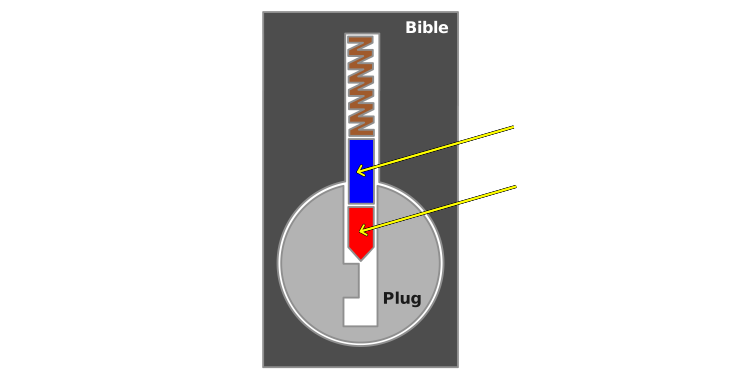
Each stack has two pins: the key and driver pin, which are pressed into the plug by a spring. When the correct key is inserted, it ramps up the stack such that the gap between the pins aligns with the edge of the plug, allowing it to rotate.
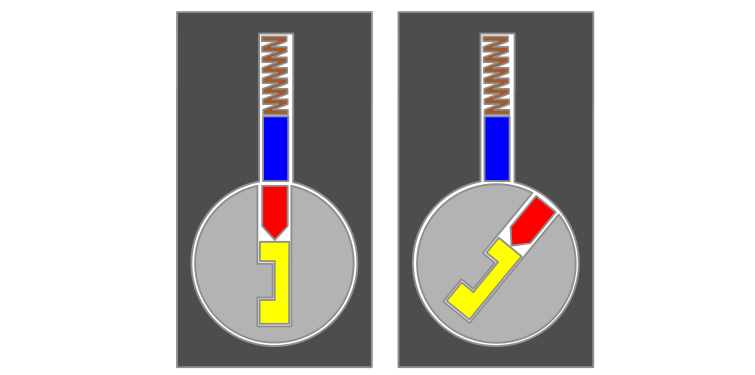
However, if that position on the key is cut to the wrong height, either the key or driver pin will jam the plug in place and prevent the lock from opening:
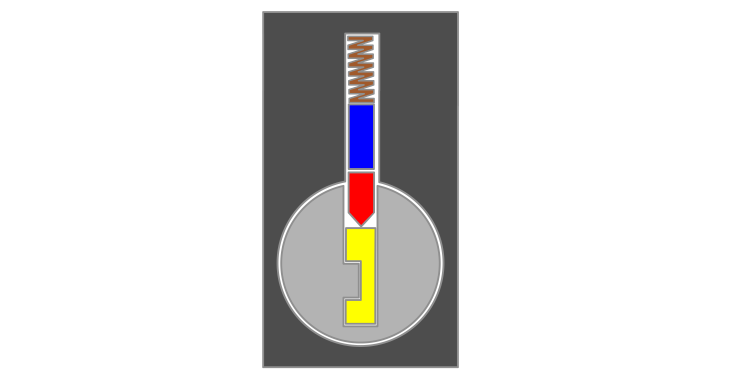
Since there are several (usually 8) possible cuts for each pin chamber, and a lock contains several pin chambers, there are thousands of distinct keys, only one of which works.
The real number of combinations is somewhat lower than you might expect, because there needs to be space for ramps on the key between positions. See: maximum adjacent cut specification.
Picking a single-pin lock is quite easy:
Use a turning-tool (a metal bar with a 90° bend) to apply torque to the plug. Simultaneously, use a pick to slowly raise the key pin: once it reaches the correct height, the plug will free up and the lock will open.
It might seem like this would never work for a multi-pin lock... but it does. Since nothing is perfect, one of the pins will jam up first. This binding pin will feel different when touched with the pick: since it's driver is rubbing against the core, it'll be difficult to lift and won't spring back.
Once the binding pin has been located, slowly lift it until it releases the plug: it won't turn very far because the other pins aren't set, but it turns enough to do two things: Lock the driver pin above the plug, and allow another pin stack to bind.
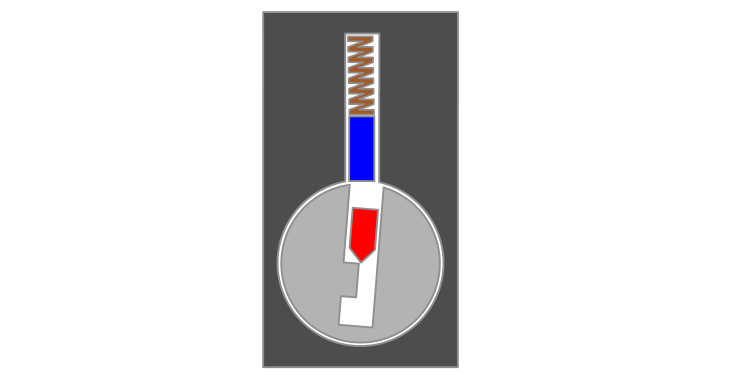
Opening the lock is just a matter of repeating this process of tentatively feeling around and lifting the binding pin. Once all pins are set into the bible, the lock will open:
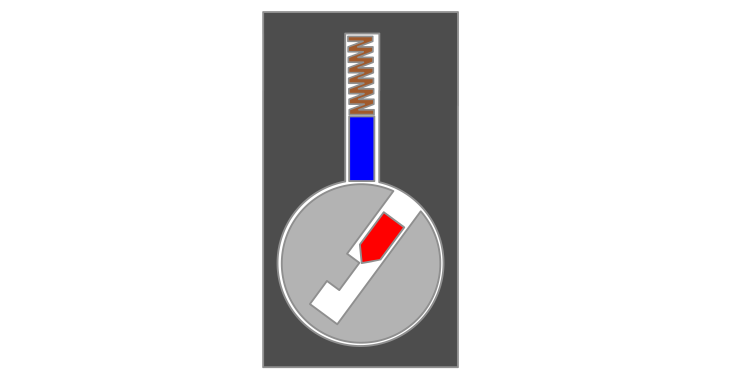
In effect, a multi-pin lock acts like a series of single-pin locks that must be picked in sequence. The tricky bit is being able to feel around inside the keyway and raise a binding pin without disturbing the others...
Tools (part 2):
Tension/turning tools are usually just a bent piece of flat wire:
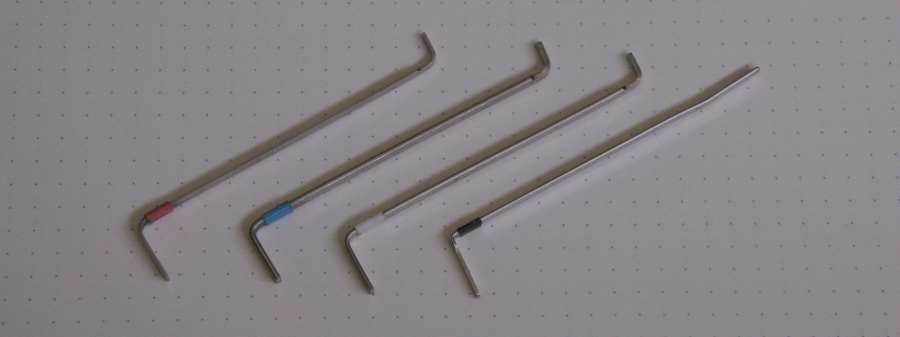
These are used to apply torque to a lock's plug which binds pins and will open the lock once it's picked. Some sources will call these "tension wrenches", but I avoid that term because it implies significant of force. Picking should be done with very light finger pressure: if the tool is indenting into your skin, you are pushing too hard.
It's possible to insert the tool opposite the pins (edge of the plug) or next to the pins (near the plug's center). Center tensioning is more fiddly, but frees up more space to maneuver picks inside the keyway. Tools for center tension must have a short tip to avoid jamming the first, but edge tension can benefit from a longer tip.
Flat/"pry-bar" style designs are less susceptible to camming out when used for center tension, but harder to make. (on account of having to be cut out instead of folded from wire)
Some sources call these bottom-of-keyway (BOK) and top-of-keyway (TOK), but this assumes the pins are above the keyway. This is how I've drawn them here, but it's common to mount locks upside down in much of Europe. Sideways locks are seen everywhere.
Since the turner is what actually opens the lock, it's a good idea to have equal or bigger variety of tensioners than picks: if the turner doesn't seat well, the lock cannot be picked.
Picks fall into two categories: lifters and rakes.
Lifting tools are designed to well... lift a single pin at a time, and are usually shaped like a hook or triangle (formally, a half-diamond):
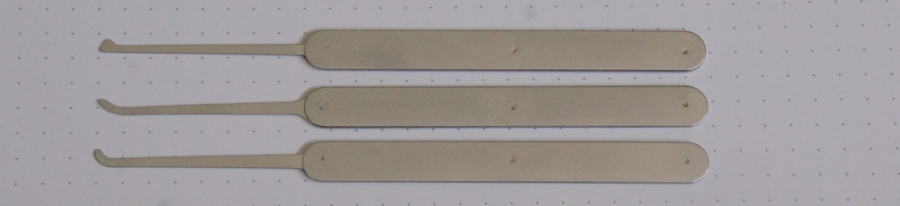
Sometimes people make a distinction between tools used by lifting the handle and ones used levering against warding... but I don't want to make anyone feel like they are picking "wrong": use whatever works best with your tool and space inside the lock's keyway.
Half diamonds should not be confused with broken-key-extractors. These are barbed tools that are sometimes included in pick sets, but they aren't picks: they are used to pull out a key that has broken off inside the lock, and will be missing the inside ramp of a half-diamond.
While lifters are the platonic ideal of lockpicking, rakes work by injecting randomness into multiple pins at the same time. This doesn't always work, but when it does, it's exceptionally fast.
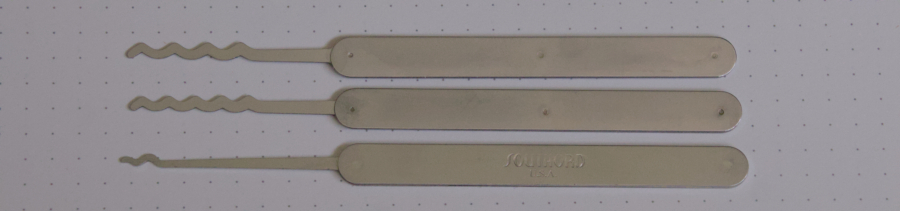
The three common designs are snake rakes, wave rakes and city rakes.
Snake rakes (top) only engage with a few pins at a time. This allows them to work locks with more variation in the key cuts, but makes them slower. The profile also allows single-pin picking of any stubborn pins.
Wave rakes (middle and bottom) are exceptionally fast, but can have problems depending on the key cuts. I often find I have to flip mine over to set a high-cut back pin.
City rakes (not shown) imitate the shape of a key. Their success is depends on how similar the profile is to the correct key.
It's also possible to use a half-diamond as a rake because it has a ramped surface on both sides. This is generally slower than a dedicated raking tool, but works great for hybrid picking: raking most of the pins and switching to single-pin picking.
All of these can be used by jiggling up-and-down (simulates keys), or scrubbing back and forth (agitates pins). The precise techniques are hard to describe, but it should involve a lot of randomness: if you are doing the same thing for more than around 4 seconds, switch it up.
Use very light tension.
By nature, rakes can often push key pins into the bible: these overset pins can be dropped down by backing off the tension, which should be done periodically.
Picking your first lock:
Some pick sets come with a clear plastic demonstration lock. These are great for seeing how your picks interact with the lock, but aren't good practice: they don't feel the same as metal locks, and you'll get into trouble if you rely on being able to see the pins.
I'd recommend picking up a few Masterlock "Number 3" laminated padlocks: these are fairly easy to open, but they are real locks and provide good feedback. Avoid dollar store locks because the mechanism is sloppy which can make them harder to pick.
This does not mean that dollar store locks are good. They are made of very low quality metal which shatters when struck. Remember, thieves break in. Additionally, they can be raked extremely quickly: my personal record is 466 milliseconds
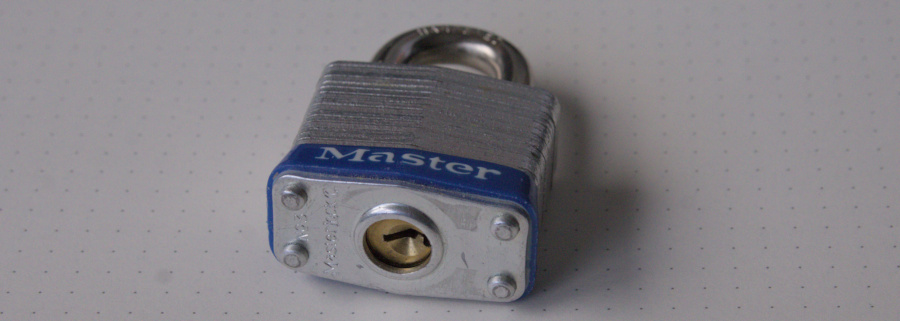
Having multiple will prevent you from memorizing how that lock behaves: you want to learn how to pick locks, not learn how to pick your particular lock.
Also, low key cuts on the front of a lock can make it tricky to reach around inside without disturbing already set pins. There is such a thing as a hard "easy" lock.
The first thing you'll want to do is scope out the lock:
- Take a look inside the keyway: note which side the pins are on and how far they protrude into the plug.
- Use a hook or half diamond to lift one of the pins. Note how strong the spring is.
- Move the pick inbetween two pins, and note how high it can go: that's how high the keyway is, which is the maximum height the pick should be lifted when picking.
- Count the pins using a hook or upside down half-diamond: push it in to the back of the lock, lift up and slowly pull it out. Each pin stack will make a click as it drops down. (both locks I recommended will have four pins)
- Practice finding and lifting each pin with your pick. Each one should be springy and lift easily. If it isn't, your pick is not on the pin stack.
Some pickers like to mark the depths of each pin on their pick's shank. There's no shame in doing this.
Ok, now it's time to pick it.
Insert the tip of a tension tool into one side of the keyway: opposite of the pins is usually easier for beginners. If you chose to tension next to the pins, ensure the tip isn't rubbing against the first one.
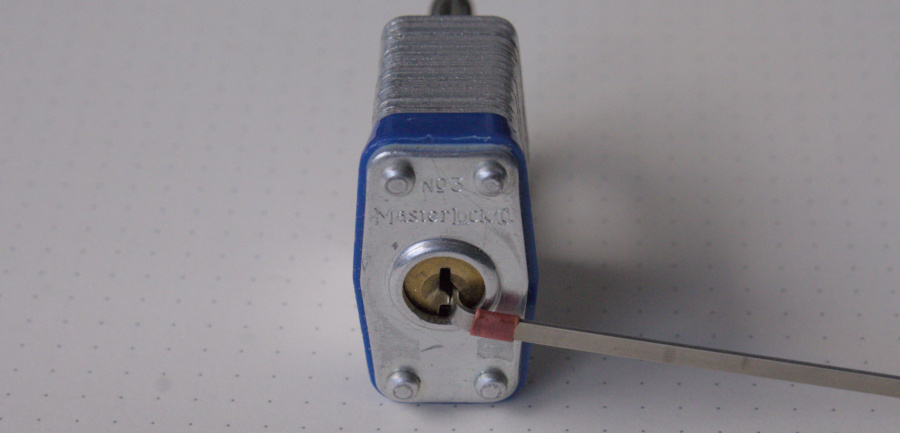
Apply very light finger pressure to the far end of the pensioner: this placement makes it easiest to feel what the plug is doing.
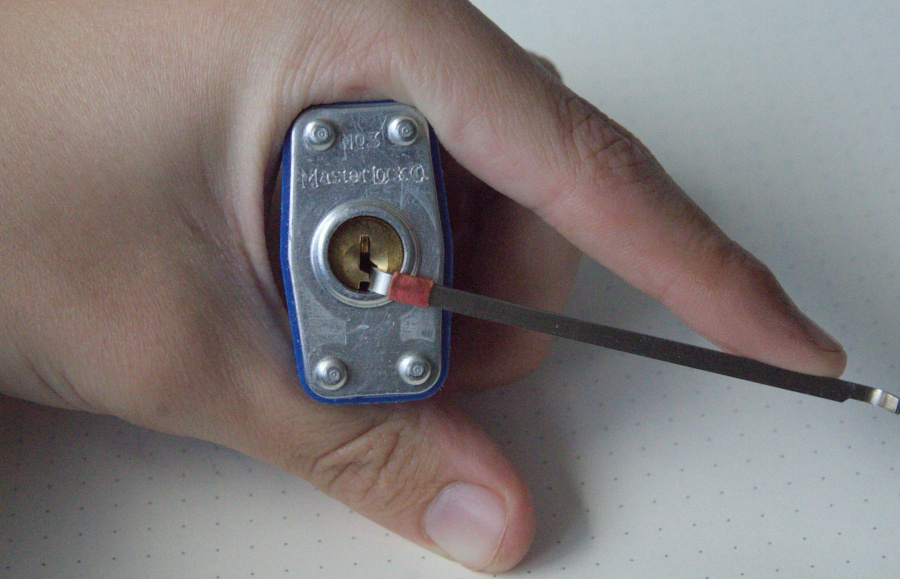
Make sure you are actually turning it the right way: if you can't get any pins to bind, you are likely turning it the wrong way.
Put your pick back inside the lock, and try lifting all the pins. One of them should feel different than it did without tension: it'll have resistance and won't be springy. Lift that pin until the lock clicks. The key pin in that stack will now be free-floating because its driver pin is stuck in the bible.
During this process, remember that lock picks are finger tools. If a pin doesn't want to lift, either your tool is not on the pin or you're using to much tension. Forcing it breaks tools and puts excessive wear on the lock.
Once all pins have been picked, the lock should open. If it doesn't:
- Try lifting each pin until you feel resistance, but no further: If the driver pins have a bit of a taper, it might have stopped binding before it's fully set.
- Another possibility is that the lock is picked, but the tension isn't strong enough to release the shackle. If you suspect this, try momentarily increasing the pressure.
- It sounds silly, but high cut on the first pin can trip people up: if you are levering off warding, lifting pin one all the way can be quite award.
If you still can't get it open, it's possible that one of the pins is overset above the shear line. It may possible to selectively drop it down by slowly backing off the tension, but often time this means "start over".
Practice:
At this point, it's a good idea to try using all your other tools: if you did it with a hook, try a half-diamond. Try it with a different style of tension. Try raking it.
Once you've exhausted all your tools, move on to another lock: even the same model with the same key will bind in a different order. I'd recommend cycling through at least five locks to prevent memorization.
Used and worn locks also pick differently than new ones: ask around if anyone has old padlocks they've lost the keys for. Locks attached to something or mounted in a door are also quite a different experience.
... although most deadbolts will have a few features that might trip you up. More on these latter.